Ok below find the code in Django 2 and bokeh I’m using 1.4 on how to use a ionden range slider to filter the chart of a data. I’m going to be posting my code so others can follow through. The way I did it doesn’t need typescript and you can write some javascript code to do the change on the front end. If there is any modification or code enhancement please let me know.
urls.py
#module where all the urls ares tored in our case it will be dashboard/ionden url link
#http://127.0.0.1:8000/dashboard/ionden
#temporary test page to see if its possible for CDSVIew to work with django errors popped up in prototype using bokeh 1,0
path('ionden', views.IonDenView.as_view(), name='ionden'),
views.py
views.py
this is going to be a class object that generates some pseudo data and saves it as a string to then display the chart into the html document similar to Django and flask. Note that this chart has two yaxis and the xtimestamps are a bit off but thats okay. I created some static arrays and saved the data.
The trick is to save the data twice into two columndatasources. One columndatasource contains the full data set that is called full_source. The second columndatasource called curr_source only contains the slice/filtered piece you wish to display.
In the javascript code you will see the curr_source data being updated by taking the array slice of the full_source the fulll data set.
from bokeh.models import ColumnDataSource,FactorRange, InputWidget, CustomJS, Slider, CDSView
from bokeh.models import IndexFilter, GroupFilter, CustomJSFilter, Select, DatetimeTickFormatter
from bokeh.embed import components
from bokeh.plotting import Figure, curdoc
from bokeh.models import Range1d, LinearAxis
from bokeh.layouts import column, row, grid, layout
import json
from bokeh.embed import json_item
from bokeh.layouts import column, row, grid
from datetime import datetime
import time
from datetime import timedelta
class IonDenView(View):
    def __init__(self):
        #class to generate some data
        self.template_name = "dashboard/ionden.html"
    def get(self, request):
        context = {}
        #third archtiecture a list of all combined this is a list of datetimestamps
        T1 = datetime.strptime("2020-04-30 00:00:00", "%Y-%m-%d %H:%M:%S")
        T2 = datetime.strptime("2020-04-30 01:00:00", "%Y-%m-%d %H:%M:%S")
        T3 = datetime.strptime("2020-04-30 02:00:00", "%Y-%m-%d %H:%M:%S")
        T4 = datetime.strptime("2020-04-30 03:00:00", "%Y-%m-%d %H:%M:%S")
        T5 = datetime.strptime("2020-04-30 04:00:00", "%Y-%m-%d %H:%M:%S")
        T6 = datetime.strptime("2020-04-30 05:00:00", "%Y-%m-%d %H:%M:%S")
        T7 = datetime.strptime("2020-04-30 06:00:00", "%Y-%m-%d %H:%M:%S")
        T8 = datetime.strptime("2020-04-30 07:00:00", "%Y-%m-%d %H:%M:%S")
        T9 = datetime.strptime("2020-04-30 08:00:00", "%Y-%m-%d %H:%M:%S")
        T10 = datetime.strptime("2020-04-30 09:00:00", "%Y-%m-%d %H:%M:%S")
        xValues = [T1,T2,T3,T4,T5,T6,T7,T8,T9,T10]

        #third archtiecture a list of all combined
        #second data construction idea
        full_datax2 = {'x': [T1,T2,T3,T4,T5,T6,T7,T8,T9,T10,
                        T1,T2,T3,T4,T5,T6,T7,T8,T9,T10,
                        T1,T2,T3,T4,T5,T6,T7,T8,T9,T10],
                    'y': [11019.3927693927, 10776.5364335049, 10665.6387722406,11019.3927693927,10776.5364335049,10665.6387722406,11019.392769392, 10819.1664372857, 10666.4884808127,13545.6409013634,
                            11019.392769392, 10819.1664372857, 10666.4884808127,13545.6409013634,14101.8252422713,14175.5187203708,11019.392769392, 10819.1664372857, 10666.4884808127,13545.6409013634,
                            10755.2114866876, 11315.4174414679, 10697.3738545654,11315.4174414679,12488.8314193305,13553.5572757138,11019.392769392, 10819.1664372857, 10666.4884808127,13545.6409013634],
                    'y1': [10900.3524214508, 10700.1149649245, 10602.7809338582,10920.2050639338,11510.2752077477,12280.3819850462,11019.392769392, 10819.1664372857, 10666.4884808127,13545.6409013634,
                            10944.5877993602, 10700.6384037727, 10602.8669280333,10920.2441548973,11510.3023680626,12280.4111885769,11019.392769392, 10819.1664372857, 10666.4884808127,13545.6409013634,
                            10723.3167123311, 11041.6511776374, 10606.1508040811,11041.6511776374,11678.5417945967,12453.5836012828,11019.392769392, 10819.1664372857, 10666.4884808127,13545.6409013634,],
                    'temp': [12, 11, 11,10,11,11,12, 11, 11,10,
                            11, 11, 11,12,13,14,12, 11, 11,10,
                            11, 15, 16,16,15,11,12, 11, 11,10],
                'z': ['1', '1', '1','1', '1', '1','1', '1', '1','1',
                        '2', '2', '2', '2', '2', '2','2', '2', '2', '2',
                        '3', '3', '3','3', '3', '3','3', '3', '3','3']}

        curr_datax3 = {'x': xValues,
                    'y': [10802.402023372, 11317.53093475, 12490.8960277275,13389.1294707906, 13494.4806046587, 13710.6162250893,10729.3107884848, 11041.769217588, 11678.6265949395, 13693.9409210058],
                    'y1': [10729.3107884848, 11041.769217588, 11678.6265949395, 13693.9409210058, 13774.3895579185, 13957.9496061794,11678.6265949395, 13693.9409210058, 13774.3895579185, 13957.9496061794],
                    'temp': [10, 10, 10, 15, 15, 16,10, 15, 15, 16],
                'z': ['10', '10', '10','10', '10', '10','10', '10', '10','10']}

        curr_source = ColumnDataSource(data=curr_datax3, name="curr_source")
        full_source = ColumnDataSource(data=full_datax2, name="full_source")

        plot = Figure(plot_width=600, plot_height=400, y_range=[0,25])
        plot.xaxis.formatter=DatetimeTickFormatter(
                        hours=["%a %b %d %Y %H"],
                        days=["%a %b %d %Y %H"],
                        months=["%a %b %d %Y %H"],
                        years=["%a %b %d %Y %H"],
                    )
        plot.xaxis.major_label_orientation = "vertical"

        #you need to duplicate the sources the second source will always exist hte first source is the one that
        #will change based on the slider or dropdown widget we select and use
        #this is empty but needed so that the ionden slider can actually filter the chart
        custom_filter = CustomJSFilter(args=dict(curr_source=curr_source, full_source=full_source), code = '''
        ''')

        #properties, js_event_callbacks
        #use CDS to filter the view
        view1 = CDSView(source = curr_source, filters = [custom_filter])

        #second y axis
        plot.extra_y_ranges['aqew2'] = Range1d(0, 30000)
        ax2 = LinearAxis(y_range_name="aqew2", axis_label="aqew2")

        plot.vbar(x='x', top='temp', source=curr_source, width=600000, legend_label='temp',view=view1 )
        plot.line('x', 'y', source=curr_source, line_width=3, line_alpha=0.6, legend_label='aqew1',y_range_name = "aqew2",view=view1 )
        plot.line('x', 'y1', source=curr_source, line_width=3, line_color='darkmagenta', line_alpha=0.6,legend_label='aqew2',
            y_range_name = "aqew2",view=view1 )

        plot.add_layout(ax2, 'right')

        l =layout([plot])

        #turn the layout into a json string
        item_text = json_item(l,'myplot')
        json_dataxxx = json.dumps(item_text)
        context.update({"item_graph":json_dataxxx})

        return render(request, self.template_name, context )
html file
ionden.html
This html file contains the chart the django class makes along with the ionden slider. It
<!DOCTYPE html>
<html>

<head>
<title> DailyDemandDaily </title>
<link rel="stylesheet" href="https://code.jquery.com/ui/1.12.1/themes/base/jquery-ui.css">
<!--Plugin CSS file with desired skin-->
<link rel="stylesheet" href="https://cdnjs.cloudflare.com/ajax/libs/ion-rangeslider/2.3.1/css/ion.rangeSlider.min.css"/>
<link rel="stylesheet" href="https://cdn.pydata.org/bokeh/release/bokeh-1.4.0.min.css" type="text/css" />
<!--bootstrap4 CDN links good to use CDN most sites use a cdn which is memory cached making this fast -->
<link rel="stylesheet" href="https://maxcdn.bootstrapcdn.com/bootstrap/4.1.3/css/bootstrap.min.css"/>
</head>


<script type="text/javascript" src="https://cdn.pydata.org/bokeh/release/bokeh-1.4.0.min.js"></script>

<script src="https://ajax.googleapis.com/ajax/libs/jquery/3.3.1/jquery.min.js"></script>
<script src="https://cdnjs.cloudflare.com/ajax/libs/popper.js/1.14.3/umd/popper.min.js"></script>
<script src="https://maxcdn.bootstrapcdn.com/bootstrap/4.1.3/js/bootstrap.min.js"></script>
<script src="https://code.jquery.com/jquery-1.12.4.js"></script>
<!--jQuery-->
<script src="https://cdnjs.cloudflare.com/ajax/libs/jquery/3.4.1/jquery.min.js"></script>
<script src="https://code.jquery.com/ui/1.12.1/jquery-ui.js"></script>
<!--Plugin JavaScript file-->
<script src="https://cdnjs.cloudflare.com/ajax/libs/ion-rangeslider/2.3.1/js/ion.rangeSlider.min.js"></script>


<script type="text/javascript">


	$(document).ready(function(){
		//embed the graph into the html document
		datax = {{item_graph|safe}};
		Bokeh.embed.embed_item(datax);

		//slider code initalize the slider
		var $range = $(".js-range-slider");

		$(".js-range-slider").ionRangeSlider({
			type: "single",
			min: 1,
			max: 3,
			from: 3,
			onStart: function(data) {
			},
			onChange: function(data,value) {
				//function that will update the chart based on slider changes
	 			varlen = Object.keys(Bokeh.index).length;
	            varnum = Object.keys(Bokeh.index)[varlen-1];
	            source = Bokeh.index[varnum].model;
	            console.log(Bokeh, Object.keys(Bokeh), Bokeh.index);
	            //console.log('index num source ', varlen, varnum, source)

	            //here you are using the bokeh index to get the two columndatasources you need that you actually
	            //named it is important you have them named to make this work and make your life easy
	            s2 = Bokeh.index[varnum].model.select_one("full_source");
	            source = Bokeh.index[varnum].model.select_one("curr_source");
	            //console.log('var1 ', source, s2);
				//console.log('onchange ran ', data.from);
				//extract each of the index values
				var zindex = s2.data['z'];
				//for the curr_source which I badly called source reinitalize the values as empty lists
			    source.data['x'] = [];
			    source.data['y'] = [];
			    source.data['y1'] = [];
			    source.data['z'] = [];
			    source.data['temp'] = [];

			    for (i=0; i < zindex.length; i++) {
			    	//loop over the index if the z index value matches the slider value which is selected it will push and
			    	//populate the x,y,y1,z,temp values from the full_source to the curr_source array. Only the matching datapoints
			    	//will be pushed
					console.log(zindex[i]);
					if (zindex[i] == data.from) {
						console.log(i, zindex[i],s2.data['x'][i],s2.data['y'][i]);
						source.data['x'].push(s2.data['x'][i]);
						source.data['y'].push(s2.data['y'][i]);
						source.data['z'].push(s2.data['z'][i]);
						source.data['y1'].push(s2.data['y1'][i]);
						source.data['temp'].push(s2.data['temp'][i]);
					}
				}
				console.log(source.data);
				//as Brydev says this is used to tell Bokeh something changed and this will update your chart
			    source.change.emit();
			},
			onUpdate: function(data, value) {
				console.log('update ran');
			},

		});

		let range_instance2 = $range.data("ionRangeSlider");
		range_instance2.update({
		});


	});
</script>


<style>
	/*slider css values*/
/*https://github.com/IonDen/ion.rangeSlider/blob/master/css/ion.rangeSlider.css*/
#sliderDiv {
	padding-bottom: 10px !important;
	margin-bottom: 10px !important;
}

.range-slider {
    position: relative;
    height: 80px;
}
</style>

<div class="row gutter-10 mb-1">
	<div class = "header_title">Meter Data</div>
</div>

<div class="row  gutter-10">
	<div class="col-12">
		<div class="radialbox gutter-10 firstrowgraph">
			<div class="myplot" id="myplot"></div>
			<div class="range-slider">
				<input type="text" class="js-range-slider" name="range-slider" value="" />
			</div>
		</div>
	</div>
</div>
</body>
</html>
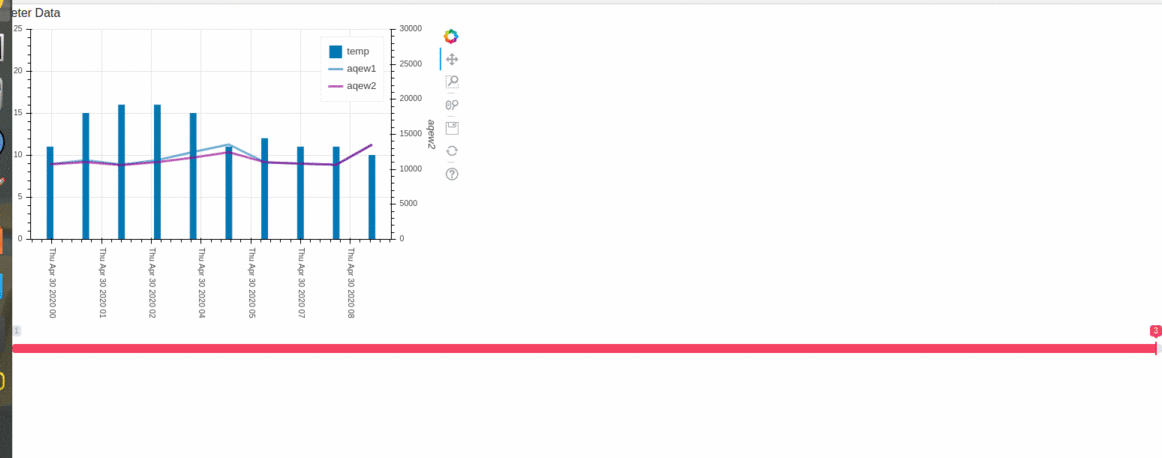
This is the output of what you will get and should see and happen
you will see the slider start at the 3rd hour as that is the default current place we wish to use
so at the url http://127.0.0.1:8000/dashboard/ionden will show the output of the following gif
Hope this helps people and the code is complete enough for people to start using the ionden slider this way and duplicate for themselves.
If there are any recommendations or optimisations people recommend please advise